Showing posts with label Artifacts. Show all posts

Wednesday, November 30, 2011

Continuous Delivery with psake and TeamCity - Visualizing a pipeline

So far we’ve covered:
  1. Creating a Local Build With psake, Part 1: Compiling
  2. Creating a Local Build with psake, Part 2: Testing
  3. Continuous Delivery with psake and TeamCity - Reusing the Local Build to Create a CI Build
  4. Continuous Delivery with psake and TeamCity - Preparing for a pipeline
  5. Continuous Delivery with psake and TeamCity - Creating a pipeline with artifact dependencies
Today I will show you how to update the build number of a deployment build with the build number of the build it is dependent on.

image
    So if we were to deploy to test and the build number of the dependent build is 1.0.0.24, we want to visualize that this build number is actually deployed to test by updating the build number from our build script. One strategy for implementing this is to let the CI build output a file with the build number and publish it to the artifact repository in TeamCity.
    The first thing we have to do is to create a task that outputs a file with the build number:
    task create_build_number_file {
        "$env:build_number"  | out-file "$base_dir\build.number" -encoding "ASCII" -force  
    }
    
    # Add this task as a dependency to ci
    task ci -depends compile, test, create_build_number_file
    
    $env:build_number is an environment variable set by TeamCity containing the build number of the running build.
    Next we have to publish this file to the artifact repository. Add build.number to the Artifact paths in TeamCity:

    image

    If we now run the CI build we should see something like the following under the Artifacts tab of the build:

    image

    So far, so good! Next up is to read this file when we deploy to test and set the build number.
    task set_build_number {
        $script:build_no = get-content "$build_artifacts_dir\build.number"
        TeamCity-SetBuildNumber $script:build_no
    }
    
    # Add this task as a dependency to deploy
    task deploy -depends set_build_number{
        Write-Output "deploying to test!"
    }
    
    # Make sure to add this line after the properties declarations
    include .\..\tools\psake\teamcity.ps1
    TeamCity-SetBuildNumber is a helper function that is defined in teamcity.ps1 which comes bundled with psake.

    We also have to tell TeamCity to download the build.number file when Deploy to Test is run:

    image

    If we run Deploy to Test the TeamCity dashboard should look similar to this:

    image

    We have now seen how we can visualize which build number is deployed to which environment. Happy days!
    As always you can download the source from GitHub.

    Wednesday, November 2, 2011

    Continuous Delivery with psake and TeamCity - Creating a pipeline with artifact dependencies

    In my last post we learned how to publish artifacts from a build that we can use to create a continuous delivery pipeline. So far in this series we’ve covered:

    1. Creating a Local Build With psake, Part 1: Compiling
    2. Creating a Local Build with psake, Part 2: Testing
    3. Continuous Delivery with psake and TeamCity - Reusing the Local Build to Create a CI Build
    4. Continuous Delivery with psake and TeamCity - Preparing for a pipeline

    Today we’ll create a build that has an artifact dependency on the CI build that we’ve already setup. This let’s us reuse the artifacts that we published in CI so that we don’t have to compile our solution once again. First, we’ll have to create a deploy task in our build script so that we can simulate a deployment. Edit build/build.ps1 and add this task:

    task deploy {
        Write-Output "deploying to test!"
    }
    

    Let’s create a build configuration called "Deploy to Test” where we will use our newly created task and simulate a deployment to a test environment. Add a Poweshell Build Step with script source:

    &  {$host.UI.RawUI.BufferSize = new-object System.Management.Automation.Host.Size(512,50); .\tools\psake\psake .\build\build.ps1 deploy}
    

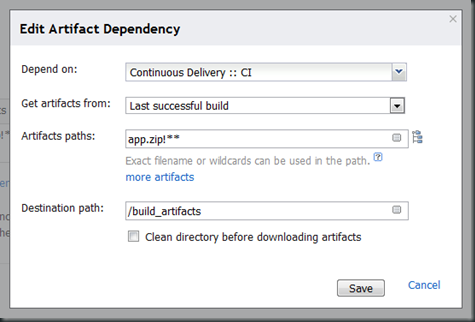
    This tells TeamCity to run psake with the specified deploy task. Next we’ll have to setup the dependency between the “Deploy to Test”-configuration and the “CI”-configuration. Go to the Dependency tab in TeamCity and click Add new artifact dependency. This brings up the following dialog where you can specify the properties of the dependency:
    image

    Here I have specified that I want to get the artifacts from the last successful build of CI and that I want to download the file app.zip and extract it to the folder build_artifacts. You can read more about this configuration and wildcards here.

    By now you might think that we're ready for running the build. However, running it would fail. The reason for this is that TeamCity wouldn’t find psake or our build script. We have to have a strategy for getting the build scripts and tools. One option is to publish them to the artifact repository from the CI build and download them from there. Another option is to download the build scripts and tools from source control. With the latter option you could potentially try to deploy new deployment items, say a web service, from a build that hasn’t got it yet. In other words, you have to be very careful if you update the build script because you always get the latest version, whereas the binaries you get from the artifact repository could be older and not contain what the build script expects. With the former option you have to go through every step in the pipeline to get an update of the build script. Say you find out that you have an error in the build script regarding deployment to production. To fix it you have to go through every step in the pipeline. This is time consuming and it also means that you cannot deploy the original build to production. You now how to deploy the new version. At my current client I have taken the former approach, but based on my experiences I would personally recommend that you download the build scripts and tools from source control. This makes it a lot easier to fix errors and do refactoring.

    Back to TeamCity, attach the VCS root that is used in CI to the build configuration under Version Control Settings, click edit checkout rules and add this:

    -:.
    +:build
    +:tools
    

    The first line says that TeamCity should exclude everything from the checkout. The next two lines add the build folder and tools folder respectively. If we save and run our build now you should get something similar to.
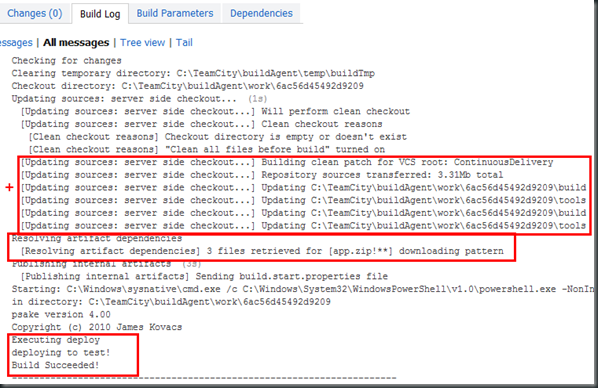
    image

    To add additional steps to the pipeline you could just publish the same downloaded binaries to the artifacts repository and make the next deployment dependent on “Deploy to Test”. Let’s say the next step is deployment to staging. Then you could say that the build that is deployed test has to be verified by QA before it’s deployed to staging by setting up a dependency where you get the last pinned build from “Deploy to Test”. This feature in TeamCity is extremely useful for adding build verification to the process.

    Next time I will show you how to label the deployment builds with the build number from CI. See ya!

    Download the source code from GitHub.

    Friday, October 14, 2011

    Continuous Delivery with psake and TeamCity - Preparing for a pipeline

    In my previous three posts I have shown how you could set up a Continuous Integration build with psake and TeamCity 6.5. This time I will show you how to prepare for continuous delivery where the artifacts from the CI build flows through several steps and environments that together form a pipeline of builds which culminates in deployment to production. It seems like this is developing into a series, so here are my previous installments:

    1. Creating a Local Build With psake, Part 1: Compiling
    2. Creating a Local Build with psake, Part 2: Testing
    3. Continuous Delivery with psake and TeamCity - Reusing the Local Build to Create a CI Build

    One of the core principles of continuous delivery is that the deployment process should be repeatable and reliable. To achieve this we have to make sure that every bit of the deployment process is automated and that we deploy in the same manner to every environment. I urge you to read Continuous Delivery: Reliable Software Releases through Build, Test, and Deployment Automation. It’s a fantastic book!

    The output produced from build is usually referred to as the build artifacts. This includes all the compiled binaries and other packages, for example installers and migration scripts for a database. It is very important that you compile you binaries only once and use the same binaries to deploy to each environment in the pipeline. To enable this the artifacts needs to be stored somewhere so that the deployment process can get it. TeamCity comes bundled with an artifact repository which can be configured in the Build Configuration. This feature allows us to associate the artifacts from a build to the build id and reuse them by setting up an artifact dependency between the different builds in the pipeline. By doing this we can say that the deployment build to for example test has a dependency on the CI build. Whenever the deployment-to-test build runs, TeamCity will automatically download the artifacts from the specific CI build you configure it to get it from, for example the last successful build of CI. In this manner we can chain or builds to create a full continuous delivery pipeline.

    Let’s get on with it and configure our CI Build Configuration to publish artifacts. Open the Build Configuration and look for “Artifact paths”:

    image

    Here you can specify files and folders that you want to publish to the artifact repository. For a detailed explanation of the format see TeamCity’s documentation. Let’s make TeamCity zip our WpfApplication so that we can deploy and distribute it in successive builds. Add the following to the “Edit artifact paths”:

    build_artifacts\Debug\ContinuousDelivery.WpfApplication => app.zip!ContinuousDelivery.WpfApplication
    

    This statement takes all the files in the ContinuousDelivery.WpfApplication folder and zips it to a ContinuousDelivery.WpfApplication folder inside app.zip. If we now run the CI build we should see that an artifacts tab has appeared and that our zip-file is displayed.

    image

    That concludes this post. Next time we will reuse the artifacts and setup a dependent build to deploy to a test environment.